The Wingsailer Manual

Assembly Instructions

- Pylon to Deck Assembly
- Wing Assembly
- Hanging the Rudder
- Centerboard Downhaul
- Wind Indicator

Transportation

- What You will Need
- Tying the Boat Down   


A Taste of Sailing

- To the Experienced Sailor
- To the Novice Sailor
- Safety
- Let's Go Sailing
- Sailing Tacks
- Tacking your Wingsailer
- From Here to There

High-Tech Talk

- Aerodynamics
- Angle of Attack


Wingsailer
Manual

~~~~~

Parts

Assembly

The Wing

Transportation

Sailing
Safety

Tacking

Righting
Instructions

Wingsailing Basics

Wingfoil
Aerodynamics

Assembly Instructions:  Pylon to Deck Assembly

* Note from the webpage publisher:  The following steps from the manual were intended for initial assembly of the Wingsailer by the original owner.

Attaching the pylon to the deck is not at all difficult if the following steps are closely adhered to:

Preparation
  -  Set the pylon over the deck flange and align the two pre-drilled holes in the front flange with the matching holes in the deck flange.
  -  Insert the two flat head 10-32 machine screws through the two holes to maintain alignment.
  -  Run a strip of at least one-inch wide masking tape all the way around the deck flange so that the top edge of the tape is exactly even with the bottom edge of the pylon.  This is to keep the deck putty from getting on the deck.

Centerboard Down Haul
  -  Drop the rope through the white fairlead that is located at the back of the centerboard well.
  -  Bring the rope forward and let it rest in the cockpit for now.  The centerboard down haul can be installed after the pylon is in place, but it is easier and quicker at this time.

Pylon to Deck
Assembly:
(Click for larger image)

Attaching the Pylon

* Note from the webpage publisher:  I have abridged the steps on mixing putty since newer putties and catalysts will probably be used and owners should follow the directions and safety precautions of the manufacturer.

  -  Mix the deck putty that will be used to attach the pylon to the deck.  Using a doctor's tongue suppressor or equivalent, mix well.
  -  Spread a layer of the deck putty around the deck flange above the masking tape so that it is completely covered.
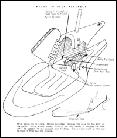
  -  Set pylon in place on the deck as before and reinsert the 10-32 screws in holes A and B.
  -  NOTE:  Use a second pair of hands or a short stick wedged inside the pylon to hold the sides apart.  This will help prevent deck flange from scraping the putty off the inside of the deck as the pylon is slipped into place. 
  -  Pull tape off hull.  Wipe off any deck putty that has gotten on the outside of the hull and pylon with a soft rag.
  -  Reach inside the pylon and remove and smooth the excess deck putty.


Reinforcing With Fiberglass Cloth

  -  Cut two pieces of 2" wide fiberglass tape about 22" long.
  -  Mix about 1/2 cup of resin with a teaspoon of catalyst.
  -  Using a 1" brush, wet a 2" strip inside the pylon and center along the seam where the pylon and deck flange meet.
  -  Lay fiberglass tape along wetted area with 1/2 the tape on the pylon above the deck flange and 1/2 the tape on the deck flange. This is to reinforce the joint between the deck and pylon.
  -  With the 1" brush and the remainder of the resin, thoroughly saturate the fiberglass tape, smooth it out and leave it to cure.
  -  Do this on both sides of the pylon.
  -  Clean brush, tools, walls, and hands to remove deck putty and resin.  (Review safety precautions.)

Owner
Photos

View
Brochures

~~~~~

Two Forums!

The Wingsailer
Message Board

NEXT PAGE >

Yahoo's
Club